This camera is heavily benchmarked on the the Lumix LX-3, a sign of the soundness of the concept developed by Panasonic: a bigger small sensor coupled with a wide fast lens (and IS).
By sporting a fully rotating LCD, Samsung may also try to lure G10/11 owners looking for a more compact camera with wider and faster lens but retaining high degree of control.
Feature highlights
A f/ stop to max 1.8
The zoom reaches a little bit over 70mm
The major plus is the screen which is high def, AMOLED and movable (Canon Powershot G style)
Has a rubber grip
Some more control options, incl.
A selector control index wheel in front
two mode dials which are flush with top cover
A click wheel on back (similar to Canon and Olympus EP-1)
The minuses are that camera dimensions do not make it exactly compact and it is roughly the same size of the Lumix (actually a couple of mm bigger here and there).
The lens has a rubber ring but it is not a custom control ring as in the Canon S90, rather it covers the ring for attaching optional lens complements that can enlarge the lens angle of view to a 18mm equivalent.
And the lens cap is separate and can be attached to the camera via a piece of string (same as lamented by almost every single LX-3 user - or is it another piece of retro design…?).
While interesting the Samsung offering will probably not have LX3/D-Lux-4 owners rushing to switch/upgrade.
Also with Panasonic possibly upgrading the LX-3 this year, and the S90 around, the EX-1 will need to demonstrate some serious advance in term of image quality compared to its direct competitors or, as usual to out cheap them.
The f/1.8 advantage is partly annulled by the size of the 1.7” sensor which has much more depth of field than a bigger sensor. So if someone hopes to use this camera for super defocus (bokeh) rendition, they may have to lower their expectations. Although, the fast lens may actually come handy in shooting in low light situations.
In terms of camera body design also improvements could be made. While this is not Sigma-sort of “East-Germany was fun” style, the shape is still a bit bulky and lines a bit too complicated (in an attempts to lightens the ensemble perhaps).
Also don’t like blue light around power switch when camera is on.
The rubber grip, while probably functional, does not match very well the dark polished metal front, in my opinion.
Exist in black or gun metal color finish.
Finally, the marketing Dept is lagging behind in promoting the new camera – still nothing (so far) on their global site.
From the conceptual point of view, Samsung basically took the LX-3 and simply added a movable LCD screen (I am oversimplifying). Now LCD screens are certainly one of Samsung’s strong points. But the more I think about it the more I wonder whether it was not a mistake to include a fully articulated screen in such a compact camera. For the following reasons: first the AMOLED screen has already an better angle of view, second, it makes the camera bulkier and compromises pocketability, third it is more a video cam sort of option and here apparently video is not really the priority (no HD).
Or maybe Samsung’s idea is actually to position the EX-1/TL-500 between the LX-3 and the G-11.
They could have made such a better product by building on the Lumix concept and improving its weak points (high iso performance, lens cap, controls, pocketability, etc…) and then price it lower to attract a larger audience, basically those tired of lugging DSLR around and that are looking for good image quality in a compact package for everyday situations.
NPC is an utility which is now part of View NX (1.5.2.), and allows to modify and apply a set of image styles to NEF/Raw pictures.
It can be used for editing the profiles included in cameras with Picture control (D3/700/300(s)/90/5000/3000).
See Nikons answer on how to modify Picture control.
Some interesting information can be found here or here
What I think is interesting is the ability offered by View NX utility to correct color fringes, to apply D-lighting or D2x styles
D2XMODE1 This optional Picture Control simulates color reproduction at a D2X/D2XS Color mode setting of I. Skin tones and gradations are reproduced naturally with rich reproduction of tones.
D2XMODE2 This optional Picture Control simulates color reproduction at a D2X/D2XS Color mode setting of II. This optional Picture Control is suited to images that will be extensively processed or retouched.
D2XMODE3 This optional Picture Control simulates color reproduction at a D2X/D2XS Color mode setting of III. Choose for nature or landscape shots. Greens and blues are vividly reproduced.
*To achieve a level of brightness similar to that of images captured with the D2X/D2XS, set Picture Control Brightness to -1. Color reproduction precisely the same as that achieved with D2X/D2XS Color mode settings I, II, and III is not guaranteed with the three D2XMODE1, D2XMODE2, and D2XMODE3 optional Picture Controls.
*D2XMODE1-3 optional Picture Controls must be registered with the camera before custom Picture Controls, based on D2XMODE1-3, can be created using Capture NX or ViewNX and registered with the camera.
A whole set of presets simulating classic film rendition (Velvia, Sensia, Kodachrome, etc.) can be found here.
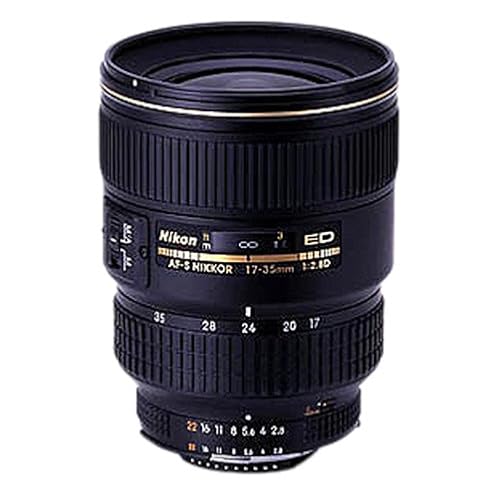
Here is a quick comparison with its predecessor the 17-35 AFS
Focal length
17-35
16-35
Max aperture
f/2.8
f/4
Min aperture
f/22
f/22
Lens construction
13 elements/ 10 groups
17 elements/12 groups
Lens Features
IF 2ED 3Asphs
IF 2ED 3Asphs N Coat
Angle
104° - 62°
107° - 60°
Diaphragm
9 blades rounded
9 blades rounded
Closest focus
0.28
0.28
Filter size
77
77
Diameter x length
82.5 x 106 mm
82.5 x 125 mm
Weight
745
680
Price
$1759.00/£1347.45/€1529.00
$1259.95/£1049.99/€1249.00
Remarks
The new zoom is slower, cheaper but there are little savings in terms of weight and dimensions, it’s actually longer.
While many features are comparable, the optical formula is different. The lower max f aperture and the fact that there are actually more lenses would point to a highly corrected formula to reduce distortion. This result in some weight saving but not much. There is no diaphragm ring on the lens.
Of course the new wide zoom has VR and last generation lens coating (Nano chrystal). Let’s also hope that the AFS is also a bit more nervous.
So If you are tired of carrying around the 14-24 and 24-70 combo, go for this zoom plus a 50/1.4 AFS.
These are my personal considerations after using the camera (and enjoying it) for over a year.
Points that could be improved
Mechanically while it’s good to have dedicated buttons, including the partially programmable Fn button, the controls and buttons should be reinforced. Without going to Nikon’s length (in its SLRs) of securing all switches, the mode dial is often pointed as a command that moves out of position too easily. The same could be said to a lesser extend for the AF selector on the side of the camera.
The aspect ratio selector on the top of the lens is in my experience less prone to misplacement. Concerning this command, while useful, I feel that it could be better used for something else. At the beginning I was playing a lot with it changing format but I quickly realized that if your aim is to make prints the 3/2 format is all you need. The lens is quite wide already and can be complemented with an additional wide angle lens. So you can frame your shot as large as possible and then crop if needed during post production phase.
Instead I think that one area that could be improved would be the zoom controls to allow user to choose exactly which lens setting they would like to use. The S90 allows this though its lens ring. Maybe the lens aspect ratio switch could be made reconfigurable so that it could at least mark the most common intermediate focal lengths (28, 35 and 50) 24 and 60 are already given by the zoom extremes.
Continuing on the lens, the lens cap is often mentioned as an issue as most people would prefer to have a retractable system. A solution is using the Ricoh cap (see video).
Frankly for me this is a lesser problem that having to remove the lens ring cover every time I attach the wide converter. Also Panasonic may have had its priorities wrong in this area as the cover is metal and the screw on the lens is plastic. The screw should be metal. It should be possible to mount the lens cap when the filter ring is exposed (like in any lens). Or was this done on purpose to avoid having people putting filters directly on the lens that would block the zoom functioning…
For any future model, I would invite engineers to spend some time on the lens casing area.
In any case I have developed a reflex (no pun intended) when I switch on the camera I systematically check that the mode selector and the lens switches are in the desired position.
Use of wide lenses complement
Selecting the lens conversion option in the REC menu freezes the lens in its widest position so you are stuck with a fixed wide lens. I never use this function as I prefer to continue using the zoom at the price of increased distortion, which I can possibly try to correct in Photoshop later, if at all needed. Of course, I try not the use the wide conversion lens when I want no distortion at all such as for portraits. For buildings, while I sometimes like to use the wide exaggerated perspective on purpose, most of times I try to use the center of the image to allow to compensate for lens distortion and subsequent cropping in post production.
In any case to shoot architecture correctly, one should use a tilt-shift lens with another camera. Interestingly, a for micro 4/3 an adaptor ring has been produced by a third party company that allows to mount many different lenses and tilt and shift them to some extend (see this site)
Instead I set the “ext.viewfinder” option in the menu to ON as this allows to switch off the display. Frankly, while this makes sense in principle, in the next revision of the firmware they could get rid of this, just allow users to switch off the LCD when they want.
Lumix converter (x 0,75 = 18mm equiv.) I have not tried as I consider it too expensive (200$). However this is the only lens complement that can be corrected in camera by selecting lens conversion in the REC menu. But that freezes the lens in its widest position so you are stuck with an 18mm equivalent lens albeit corrected. Of course you can choose not the use the electronic correction and benefit from the flexibility of the zoom but then you can use another cheaper conversion lens.
Nikon WC-E68 (x 0,68, approx 16mm equiv.) distorts more at edges so try to allow margin to crop. Image quality at center is good. The lens is heavy (relatively speaking). Turns the camera lens into a 16-40mm lens.
Other Third Party (Raydiox and other on Ebay) I have one that is no brand (glass make) intended for video. It has a 0.45x enlargement which makes for approx 11mm equiv. has lot of distortion but turns the camera into an 11-27 mm zoom f2-2.8 (difficult to beat…)
What I like
- The lens: for its reach. let’s not forget this was the first compact camera with a max 24/2 zoom lens. For its resolution/contrast compromise close to Leica classic lenses, colors are natural and pleasantly saturated. With this lens the camera is a killer in low contrast situations. In high contrast scenes, the sensor tends to burn the highlights…
- The LCD screen, better than those found on many DSLR and nearly all compact with just a handful of exceptions (most Lumix upscale compacts e.g. TZ7, S90 and G11, and…that’s it).
- The customization menus, (especially after the addition included in firmware release 2.1.) notably the choice of 4 aspects ratios, white balance bracketing, which in turns may make the camera a bit complicate at first and for beginners.
- Automatic (IA) mode gets great exposures – it’s the only mode in this camera that nearly never burns the highlights. New High-Dynamic scene mode is also great.
- I-Exposure mode, which can be configured on the Fn button has three positions. Does not apply to raw images but cannot be used if shooting raw + jpeg, as it probably it would reduce frame rate. On Jpegs it increases noise significantly. Images taken that way (in most cases) can easily be treated with noise reduction software in post production, which mean that probably a noise treatment could be done onboard possibly
- Macro capacity: this camera has an impressive macro capacity with minimum focusing distance of 1cm (0.03 feet) in wide position, good macro AF performance.
Desired features in future product updates/iterations
Contrary to many users, I don’t mind if a camera with these potentials in terms of image and controls gets bigger and bulkier. Even bigger than EP/GF 1, which by the way inherit many aspects of the LX3, one being the lack of view-finder...
Ideally, LX3’s successor would mainly have to improve the sensor’s dynamic range, by incorporating new developments like backside illuminated image sensor and maybe better definition HD video. And possibly extending the zoom tele range to 75 to 85mm to allow for a real portrait capability, especially if max aperture remains f2.8.
But Panasonic may also consider enlarging its Lumix range toward bigger model in the rangefinder format which could take the following form:
Reviving the Porro prism rangefinder design (reviving the DMC-L1/E-330 chassis) with a 4/3 lens mount updating the electronic a big 3,5”/931k LCD screen, redundant and customizable controls, including click wheel on the back, joystick selector, double processor, ideally one only dedicated to image processing and one for AF, exposure and other camera controls.
[Incidentally 43rumors is asking today “Why not copy the L1 design to create a "rangefinder" styled MFT camera?” …]
A fixed zoom similar to the lens of the LX3 possibly redesigned for a bigger sensor micro 4/3 or even APS sized, with EVF finder on side, such a camera could be also sold by Leica. I think I would buy that camera if remain below 1000$ price tag. Maybe a little more, if really great lens and double core.
- As in many cameras (M9 anyone?), just put two processors
- Tripod socket off center – requires adapter
Shooting with one hand is of course possible and easier when using a compact camera. With your right hand you can control
Shutter release,
Zooming switch
Mode selector
Focus button and
Joystick with your thumb to access quick menu
It is difficult if not impossible for me to hold the camera safely and operate the other buttons on the back – which makes accessing the menu while holding the camera with my right hand quite impossible.
The AF selector is not reachable. Although I understand that it is position on the left side to avoid inadvertent operation, I think it could be placed on right side, given that it can get misplaced during manipulation of the camera anyway.
Overall, I think I would welcome a bigger hand-grip….
The possibility offered by the camera to shoot Raw, with the further option to have the JPEG in various formats, is a BIG plus. This in conjunction with the Leica lens makes it a killer camera, although to achieve the full potential in terms of image quality it inevitably requires some post-processing.
Much has been written about Panasonic RW2 format. That it applies some lens correction that goes missing if using other programmes than Silkpix. That it applies some degree of noise reduction. Etc. etc.
C-net Asia suggests that setting the Jpeg noise reduction and sharpening to minimum in the mode menu would also allow better post-processing for the RW2 files.
1.1. Codecs and conversions
Anyway it took some time for the RW2 format used by the LX3 to become supported by the main photo editing software programmes and it remain unsupported by Mac OS (although Silkpix and Photoshop for Mac function with RW2).
For Mac OS users you havecan to use Jpegs or convert RW2 to DNG or TIFF.
[Update 02/10/2010 Apple add compatibility for LX3 and D-Lux4Digital Camera RAW Compatibility Update 3.0]
For Windows to display RW2 images on Windows Vista and 7 get the LUMIX RAW Codec 1.0 here
For other Windows WIC enabled OS, you may use WIC RAW Codec pack
Windows live photo gallery can convert RW2 into Jpegs, MS own format WMP or HD photo as well as TIFF. (go to FILE>Make a copy> save as type)
Similar approaches can be found in other free photo viewer programmes (such as Irfan, Fastone, etc.).
DNG conversion can be done through Adobe photo manipulation software. Adobe stand-alone and free DNG converter can be found here also for Mac OS.
Arcsoft raw viewer for WIN also allows to display raw files under WIN OS but does not cover Panasonic RW2
1.2. Example of workflow
Shoot raw (or if you need immediate results and have space also JPEG better quality)
Use any programme that you like. Converting RW2 to JPEG, DNG or Tiff is now fairly common place.
Normally if I shoot both Raw and Jpeg, I would use the jpeg for all practical purposes such as small prints, internet posting, emailing etc.
For this purposes I would intervene little or not at all on the image relying on properly exposed shot. For small format: a bit of contrast and sharpening and some cropping may be necessary, some noise reduction also.
Basically I would convert to jpeg only at end of processing or not at all, as my main aim is to use this longer but more qualitative method to execute my own prints.
Before that I would typically adjust exposure, contrast, and remedy blown highlights as much as possible (which inevitably with this sensor is what I spend on more time than I would wish).
With Lightroom, I use some handy presets notably for Black and White conversion. I find free presets useful especially when they are already organized into a workflow structure (for WB, Tone, highlight/Shadows, midtones, etc.). Then I would adjust perspective and crop through Photoshop. Noise reduction can be done possibly using external programmes such as Noiseware or Noiseninja.
The current line up of Nikon cropped sensor DSLR (DX) is based around a 12.3 mpix CMOS sensor coupled with a new 14 bits processor (Expeed in Nikon terminology).
This sensor/processor combination has been implanted first in the D300 released in 2007 alongside the similar technology full frame CMOS sensor camera the D3. It was used as a basis for the expert model D90 (2008) and the entry-amateur model d5000 (2009). The D300s constitute an update of the 2007 model, which include video capture and some other minor improvements.
The D300-based series described above constitute a substantial upgrade compared to its predecessor based on the sensor/processor combination initiated on the D200. Please note that D80 and d3000 are also based on this architecture.
Main differences between D300 and D200
D200
D300
sensor
CCD 10.2 mpix
CMOS 12.3 mpix
processor
12 bits
14 bits
LCD
low res 2.5”/230k
high res 3”/920k
AF areas
11
51
max fps
5
7 (8 wt grip)
meter
same
same
live view
No
Yes
sensor cleaning
No
Yes
D-lighting
No
Yes
max iso
100-3200
100-6400
max usable iso
800
1600
viewfinder
95x
94x
Substantial improvements include
Better low ISO and dynamic range performance
Better, bigger and higher res LCD (3”/920k) for D300/300s/90, smaller res but movable LCD for d5000
Better battery performances (with for most model same type of battery EN-EL 3e for D200/300/300s/90)
In camera corrections like Dynamic Range optimization (D-lighting) or for lens defect like lateral fringes
Introduces live view and video capability (except D300)
The three main models currently available with the 12.3 Cmos sensor differ mainly in built and mechanical aspects which affect price and weight, the image quality is largely comparable.
These are the main differences
D300S
Same as D300 plus
HD Video capture (720p/24fps), stereo input,
Dual card slot (CF+SD)
Live view with dedicated button and artificial horizon
D300
Main differences vs D90/D5000
Bigger viewfinder
More dedicated buttons
More sophisticated metering sensor
Can matrix meter manual lenses
Heavier and more weather resistant mostly metal body
High speed operation and frame rate
Faster and more precise AF (51 points)
D90
Main differences with D300
Smaller and lighter plastic body – not sealed
Smaller finder
But same LCD screen
Slight advantage in high ISO performance
Cannot meter with manual (non-chipped) lenses
Less precise 11 areas AF system
Retains two control wheels (thumb and index) controls
Uses SD card
D5000
Main differences with D300/D90
Lower res LCD movable
No AF motor in body, AF only AFS lenses
Just one control wheel
Main differences between D300/D90 and D5000
D300
D90
D5000
Body
finder
94x/100%
94x/96%
78x/95%
AF
51
11
11
LCD
high res 3”/920k
high res 3”/920k
2.7”/230k moving
Meter
1005-pixel RGB
420-pixel RGB
420-pixel RGB
meter Ai/Ais
Y
N
N
Weight empty
840g
620g
560g
Price
1200-1500
700-900
500-700
Please note that D200 and D300 share a similar chassis based on F100. D80 and D90 share similar chassis based on F80.
The content, presentation, text and images of this blog and internet page is covered by copyright owned by the author, except when owned by other parties.
Parts or content should not be reproduced and/or used for commercial or any other purposes without the author expressed agreement.